on
2021년 GraphQL 가입(백엔드)
2021년 GraphQL 가입(백엔드)
반응형
공식 문서는 튜토리얼을 최신 상태로 유지하지 않는 것 같습니다. 그렇죠? 예를 들어 typescript를 사용하여 express.js 서버에 graphql 구독을 설정하려고 한다고 가정해 보겠습니다. 먼저 구독에 대한 type-graphql 설명서를 찾아보십시오. 이 설명서에서 아폴로 서버를 사용하라고 안내합니다. 아폴로 서버 설명서를 방문하면 페이지 상단에 아폴로 서버의 최신 버전(버전 3)이 기본적으로 구독을 지원하지 않는다고 명시되어 있습니다. 페이지의 나머지 부분은 구독 서버를 호스트하기 위해 웹소켓 연결을 설정하는 대신 구독-전송-ws 패키지를 사용할 수 있는 방법을 설명합니다. 자세한 내용은 구독-트랜스포트-ws github으로 이동하지만 패키지가 더 이상 지원되지 않으며 대신 graphql-ws 라이브러리를 사용해야 합니다.
좋아요, 아마 제가 생각하는 것만큼 그렇게 성가신 일은 아닐 거예요. 단순히 개발자가 되는 것의 위험성이라고 말하는 사람도 있을 것이다. 그리고, 신용이 필요한 곳에 신용을 부여하면, 아폴로의 문서는 대부분의 문서보다 더 우호적이기 때문에, 혼자서 모든 것을 알아내는 것은 그리 어렵지 않을 것입니다. 즉, graphql이나 일반적인 백엔드 개발을 시작하는 경우 이 모든 작업이 원하는 것보다 더 오래 걸립니다.
0단계: 필수 조건
익스프레스 서버 설정
이미 익스프레스 서버를 가동하여 실행 중인 경우 첫 번째 단계로 이동합니다. 나는 이 단계가 대부분의 독자들에게 불필요할 것으로 기대한다.
node.js, npm 및 yarn이 설치되어 있는지 확인합니다. 프로젝트 디렉토리에서 다음 명령을 사용하여 노드 환경을 시작합니다.
yarn init
yarn init에서 요청하는 모든 질문을 무시할 수 있습니다. 생성된 패키지를 교체할 예정입니다.다음을 포함한 json:
{ "name": "graphql-subscription-example", "version": "1.0.0", "description": "type-graphql subscription using apollo server", "scripts": { "watch": "tsc -w", "dev": "nodemon dist", "start": "node dist", "build": "tsc" }, "dependencies": { "cors": "^2.8.5", "express": "^4.17.1" }, "devDependencies": { "@types/node": "^16.7.4", "@types/cors": "^2.8.12", "@types/express": "^4.17.13", "nodemon": "^2.0.12", "typescript": "^4.4.2" } }
프로젝트 디렉터리에서 tsconfig.json 파일을 만들고 다음을 추가합니다.
{ "compilerOptions": { "target": "es2018", "module": "commonjs", "lib": ["dom", "es6", "es2018", "esnext.asynciterable"], "skipLibCheck": true, "sourceMap": true, "outDir": "./dist", "moduleResolution": "node", "removeComments": true, "noImplicitAny": true, "strictNullChecks": true, "strictFunctionTypes": true, "noImplicitThis": true, "noUnusedLocals": false, "noUnusedParameters": false, "noImplicitReturns": true, "noFallthroughCasesInSwitch": true, "allowSyntheticDefaultImports": true, "esModuleInterop": true, "emitDecoratorMetadata": true, "experimentalDecorators": true, "resolveJsonModule": true, "baseUrl": "." }, "exclude": [ "node_modules", "dist", "server/migrations" ], "include": [ "./server/**/*.ts", "./server/**/*.d.ts" ] }
기본적으로 typescript 컴파일러가 /server 디렉토리의 내용을 /dist 디렉토리로 컴파일하도록 지시합니다.
프로젝트 디렉터리에 /server 폴더를 만들고 index.ts 파일을 만듭니다. 인덱스.ts에서 다음을 추가합니다.
import express from 'express'; import {createServer} from 'http'; import cors from 'cors'; const PORT = 5000; (async()=>{ const app = express(); const server = createServer(app); const corsOptions = { origin: '*', //for now at least, for testing purposes, } app.use(cors(corsOptions)); app.get('/', (req,res)=>{ res.send('hello'); }); server.listen(PORT, ()=>{ console.log('server runnning on port ${PORT}') }); })();
실 워치나 실 빌드 둘 중 하나로 당신의 코드를 작성하세요. "watch" 스크립트는 .ts 파일을 편집할 때마다 다시 컴파일하기 때문에 개발 시 편리합니다. 그러나 서버를 실행하려면 다른 터미널을 열어야 합니다.
서버를 실행하려면 yarn dev 또는 yarn start 명령을 실행합니다. dev 스크립트는 /dist 디렉토리의 모든 파일 변경사항을 수신하는 nodemon을 사용합니다.
서버가 가동되어 실행되면 선택한 브라우저에서 http://localhost:5000 url로 이동하여 브라우저가 다음을 렌더링하는지 확인합니다.
1단계: GraphQL 서버 설정
이전 단계를 건너뛰신 분들을 위해, 환영합니다. 걱정하지 마세요. 당신은 급행 미들웨어를 그대로 유지할 수 있습니다.
다음 패키지를 설치합니다.
yarn add grapqhl type-graphql reflect-metadata class-validator
마지막 두 패키지는 type-graphql에 대한 종속 변수입니다.
index.ts 또는 익스프레스 서버를 정의하는 .ts 파일에서 다음과 같이 패키지를 가져옵니다.
import {GraphQLSchema} from 'graphql'; import 'reflect-metadata'; import {makeSchema} from 'type-graphql';
type-graphql 전에 reflect-metadata를 가져와야 합니다. 또한 tsconfig.json에 다음과 같은 컴파일러 옵션이 true로 설정되어 있는지 확인하십시오.
js "emitDecoratorMetadata": true, "experimentalDecorators": true,
이제 첫 번째 해결사를 만들어 봅시다. /server 디렉토리에 /resolver 디렉토리를 작성합니다. /resolvers 디렉토리에서 hello.resolver.ts 파일을 만들고 다음을 추가합니다. ```js import {Resolver, Query} from 'type-graphql'; // type-graphql's class decorators conveniently generates our type-defs for us, allowing us to solely focus on writing the resolvers @Resolver() export class HelloResolver { @Query(() => String) async hello(): Promise { return 'hello'; } } ``` 이제 index.ts로 돌아가서 graphql 스키마를 생성합니다. 일반적으로 스키마를 정의할 때 리졸버와 유형 정의를 모두 정의해야 합니다. 그러나 type-graphql 장식자를 사용하여 리졸버를 정의하면 buildSchema 함수가 편리하게 type 정의를 생성해 준다. ```js import {HelloResolver} from './resolvers/hello.resolver'; import {buildSchema} from 'type-graphql'; ... const GraphQLSchema = await buildSchema({ resolvers: [ HelloResolver, ], }); ``` 이제 graphql 끝점을 만들어야 합니다. 아폴로 서버 패키지는 우리를 위해 이것을 합니다. 그리고 오늘날 우리가 초점을 맞추지 않을 다른 많은 편리한 기능들도 있습니다. 하지만 여기서 직접 배울 수 있습니다. ```js yarn add apollo-server-express ``` 고속 서버를 운영하고 있기 때문에 아폴로-서버-익스프레스 서버를 특별히 설치해야 합니다. ```js import {ApolloServer} from 'apollo-server-express'; ``` 이제 아폴로 서버를 초기화해 보겠습니다. ```js const apolloServer = new ApolloServer({ schema, context: ({req,res})=>({ req, res, // And other objects you'd like to add to your graphql context }), }); await apolloServer.start(); apolloServer.applyMiddleware({ app, cors: corsOptions }); ``` 필수 조건을 건너뛰고 코르스 미들웨어를 사용하는 경우, 코르 옵션을 applyMiddleware 기능에 적용해야 합니다. 또한 모든 원본에 대한 액세스를 허용하지 않는 한 https://studio.apollographql.com을 화이트리스트에 추가해야 합니다. 서버를 컴파일하고 시작합니다. 브라우저에서 http://localhost:5000/graphql을 방문하십시오. 자동으로 아폴로 스튜디오의 graphql 샌드박스로 리디렉션되어야 합니다. 이전에 작성한 hello 쿼리를 사용하여 원하는 결과를 반환하는지 확인하십시오. 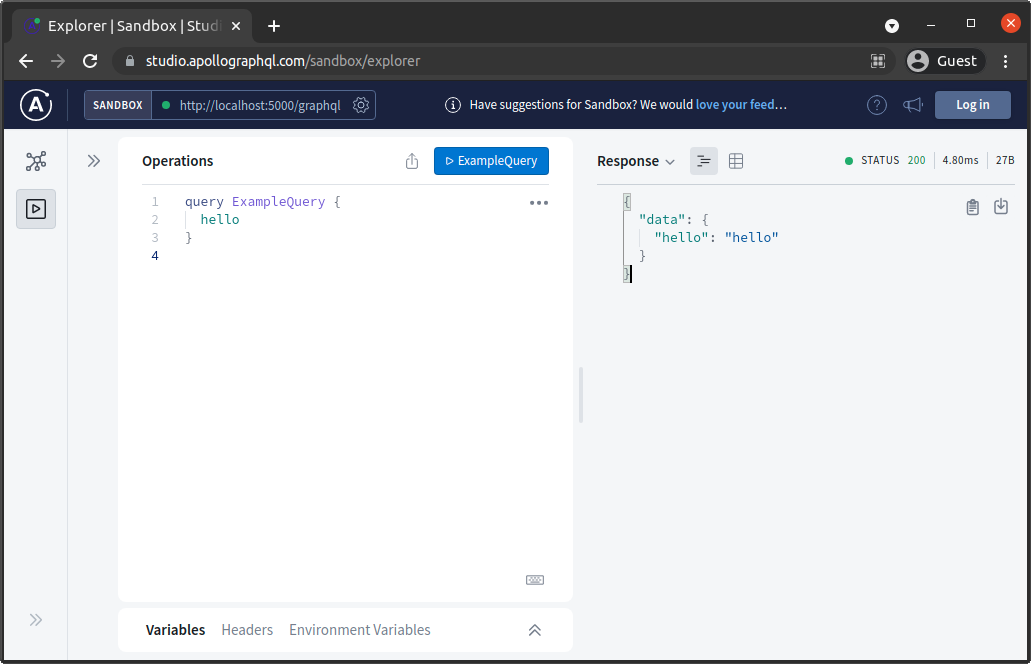 지금까지 모든 단계를 수행한 경우 인덱스는 다음과 같이 표시됩니다. ```js import express from 'express'; import {createServer} from 'http'; import cors from 'cors'; import { GraphQLSchema } from 'graphql'; import "reflect-metadata"; import { buildSchema } from 'type-graphql'; import { ApolloServer } from 'apollo-server-express'; import { HelloResolver } from './resolvers/hello.resolver'; const PORT = 5000; (async ()=>{ const app = express(); const server = createServer(app); const corsOptions = { origin: '*', //for now at least, for testing purposes, } app.use(cors(corsOptions)); app.get('/', (req,res)=>{ res.send('hello'); }) const schema: GraphQLSchema = await buildSchema({ resolvers: [ HelloResolver, ], }) const apolloServer = new ApolloServer({ schema }); await apolloServer.start(); apolloServer.applyMiddleware({ app, cors: corsOptions }); server.listen(PORT, ()=>{ console.log('server runnning on port ${PORT}') });); })() ``` # 2단계: 웹소켓 구독 서버 웹소켓에 대한 자세한 설명은 인터넷 상의 다른 곳에서 찾을 수 있지만, 이 기사에 관한 한, 우리가 알아야 할 것은 웹소켓 연결을 통해 클라이언트가 각 응답 전에 서버를 폴링할 필요 없이 구독 응답을 클라이언트에 보낼 수 있다는 것입니다. 먼저 다음 패키지를 설치합니다. ```js yarn add ws graphql-ws ``` 첫 번째 패키지는 우리의 http 서버와 우리의 웹소켓 연결을 만든다. 두 번째 패키지는 graphql 스키마를 웹 소켓에 연결합니다. index.ts에 다음을 추가합니다. ```js import ws from 'ws'; ... const wsServer = new ws.Server({ server, path: '/graphql', }); ``` 이것은 ws 패키지에 /graphql 경로에 대한 웹소켓 연결을 http 서버를 통해 생성하도록 지시한다. 이제 웹 소켓을 그래프ql 스키마에 연결해야 합니다. 다시, 우리의 색인에서, ```js import {useServer} from 'graphql-ws/lib/use/ws'; server.listen(PORT, () => { useServer({ schema }, wsServer); console.log('server runnning on port ${PORT}'); }); ``` 물론, graphql 서버가 닫힐 때 웹소켓 연결을 안전하게 차단할 수 있는 방법이 필요합니다. 아폴로서버 객체에 플러그인을 추가하면 됩니다. ```js const apolloServer = new ApolloServer({ schema, plugins: [{ async serverWillStart() { return { async drainServer() { wsServer.close(); } }; } }], }); ``` 이것은 아폴로 서버 자체가 닫힐 때 웹 소켓을 닫도록 아폴로 서버 개체에 지시합니다. ## GraphQL 놀이터 문제 널리 사용되는 graphql-playground IDE는 웹 소켓 연결에 graphql-ws를 사용하지 않는다. 대신 graphql-ws의 지원되지 않는 이전 구독-transport-ws를 사용합니다. 이 구독은 graphql-ws와 자동 역호환성이 없습니다. 대신 graphql-ws 패키지 작성자가 만든 이 html 페이지를 사용하여 구독을 테스트합니다. 클라이언트 측 graphql-ws 개체를 사용하여 graphiql(더 작은 graphql IDE)을 렌더링합니다. 언제든지 다른 경로를 사용하여 html 페이지를 로드할 수 있지만 /graphql 경로에 graphql IDE를 렌더링하는 것이 편리합니다. 이렇게 하려면 프로젝트 디렉터리에 파일을 다운로드하십시오. html 파일은 /dist 폴더의 js 스크립트에서도 액세스할 수 있어야 합니다. 그런 다음 다음 코드를 index.ts에 추가합니다. ```js import path from 'path'; ... app.get('/graphql', (req,res)=>{ res.sendFile(path.join(__dirname, '../graphiql-over-ws.html')); }) ``` 아폴로 서버 개체를 만들기 전에 이 코드를 추가하는 것이 중요합니다. 그렇지 않으면 /graphql 경로가 graphiql html 파일을 렌더링하는 대신 아폴로 스튜디오로 리디렉션됩니다. 서버를 다시 시작하고 브라우저에서 http://localhost:5000/graphql을 방문하면 다음 페이지가 표시됩니다. 모든 것이 계획대로 작동하는지 확인하기 위해 `hello` 쿼리를 사용해 보십시오. 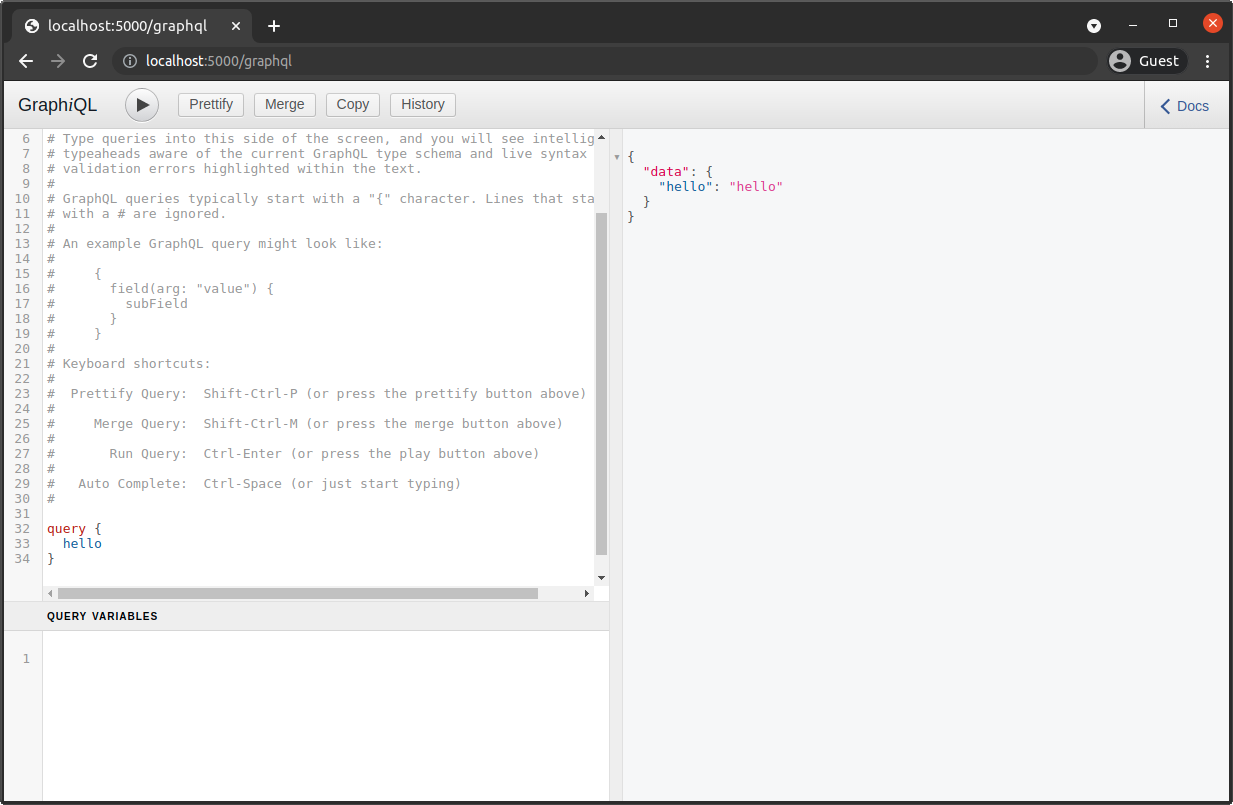 # 3단계: PubSub 엔진 설정 "게시-구독 (게시/서브) 시스템은 이름이 암시하는 대로 작동한다: 한 쪽 끝에는 메시지를 게시하고 다른 쪽 끝에는 특정 메시지를 듣는 가입자들이 있다. pubSub 개체는 graphql 구독을 서버 내 이벤트에 연결하는 개체입니다. 서버 어딘가에 "게시자"가 있으며, pubSub 객체에 이벤트 주제와 페이로드가 있는 게시 함수를 호출합니다. graphql 구독 확인자가 이 이벤트를 수신하고 수정된 페이로드가 반환됩니다. ```js pubsub.publish('EVENT_TOPIC', payload) ``` 우리는 graphql-redis-subscriptions 패키지에서 제공하는 PubSub 엔진의 Redis 구현을 사용할 것이다. 원하는 경우 다른 구현을 사용할 수 있습니다. ```js yarn add ioredis graphql-redis-subscriptions ``` 또한 @type/ioredis를 dev-dependency로 설치해야 합니다. ```js yarn add -D @types/ioredis ``` 예를 들어 PubSubEngine 유형을 사용하려면 graphql-subscriptions 패키지를 설치해야 할 수 있습니다. Redis가 설치되어 있지 않은 경우 지금 설치한 후 계속 진행하십시오. 시스템에 redis-server를 설치하기 위한 지침은 여기에서 찾을 수 있습니다. index.ts 파일에서 다음을 추가합니다. ```js import { RedisPubSub } from 'graphql-redis-subscriptions'; import * as Redis from 'ioredis'; const options = { // Your Redis Options. // You can leave it blank if you're just using the redis server installed on your system. }; const pubSub = new RedisPubSub({ ..., publisher: new Redis(options), subscriber: new Redis(options) }); ``` 스키마 생성기에 pubSub 개체를 추가합니다. 따라서 @PubSub() 장식기를 사용하여 해결 프로그램에서 pubSub 개체에 액세스할 수 있습니다. 헤드라인 등록에서 @Root() 장식기를 사용하여 트리거된 항목의 페이로드에 액세스할 수 있습니다. 이것은 다음 단계에서 시연될 것이다. ```js const schema: GraphQLSchema = await buildSchema({ resolvers: [ HelloResolver, MessageResolver, ], pubSub, }) ``` 잘 됐네요. 이제 드디어 graphql 구독을 작성할 수 있습니다. # 4단계: GraphQL 가입 /resolvers 디렉토리에서 파일 메시지.resolver.ts를 만듭니다. 먼저 임의의 수신자에게 메시지를 보내는 간단한 graphql 돌연변이를 만들어 보겠습니다. ```js import { Mutation, Arg, PubSub } from 'type-graphql'; import { PubSubEngine } from 'graphql-subscriptions'; @Mutation(() => String) async sendMessage( @Arg('message') message: string, @PubSub() pubSub: PubSubEngine ): Promise { await pubSub.publish('MESSAGE_NOTIFICATION', { message }) return message; } ``` 자, 이제 보충 구독을 써 봅시다. ```js import {Subscription, Root} from 'type-graphql'; @Subscription(()=>String, { topics: 'MESSAGE_NOTIFICATION', }) async receiveMessage( @Root() root: MessagePayload ): Promise { return root; } ``` receiveMessage 구독은 pubsub 엔진의 `Message_NOTITION` 항목을 청취합니다. @Root() 장식된 구독에서 페이로드에 액세스합니다. type-graphql 장식자를 사용하여 MessagePayload 유형을 명시적으로 정의해야 합니다. 그렇지 않으면 buildSchema 함수가 스키마의 유형 정의를 자동으로 생성할 수 없습니다. ```js @ObjectType() class MessagePayload { @Field() message: string } ``` 따라서 message.resolver.ts는 다음과 같아야 합니다. ```js import { Resolver, Subscription, Mutation, PubSub, Arg, Root, ObjectType, Field, } from 'type-graphql'; import {PubSubEngine} from 'graphql-subscriptions'; @ObjectType() class MessagePayload { @Field() message: string } @Resolver() export class MessageResolver { @Mutation(() => String) async sendMessage( @Arg('message') message: string, @PubSub() pubSub: PubSubEngine ): Promise { await pubSub.publish('MESSAGE_NOTIFICATION', { message }) return message; } @Subscription(()=>MessagePayload, { topics: 'MESSAGE_NOTIFICATION', }) async receiveMessage( @Root() root: MessagePayload ): Promise { return root; } } ``` 스키마 정의에 해결사를 추가하는 것을 잊지 마십시오. ```js const schema = await buildSchema({ resolvers: [ HelloResolver, MessageResolver, ], pubSub, }) ``` 좋아요, 구독이 실제로 효과가 있는지 확인해 볼 시간이에요. 서버가 실행 중인지 확인하고 이제 두 창 또는 탭의 http://localhost:5000/graphql 페이지를 방문하십시오. 한 창은 구독을 위한 창이고 다른 창은 돌연변이를 위한 창입니다.  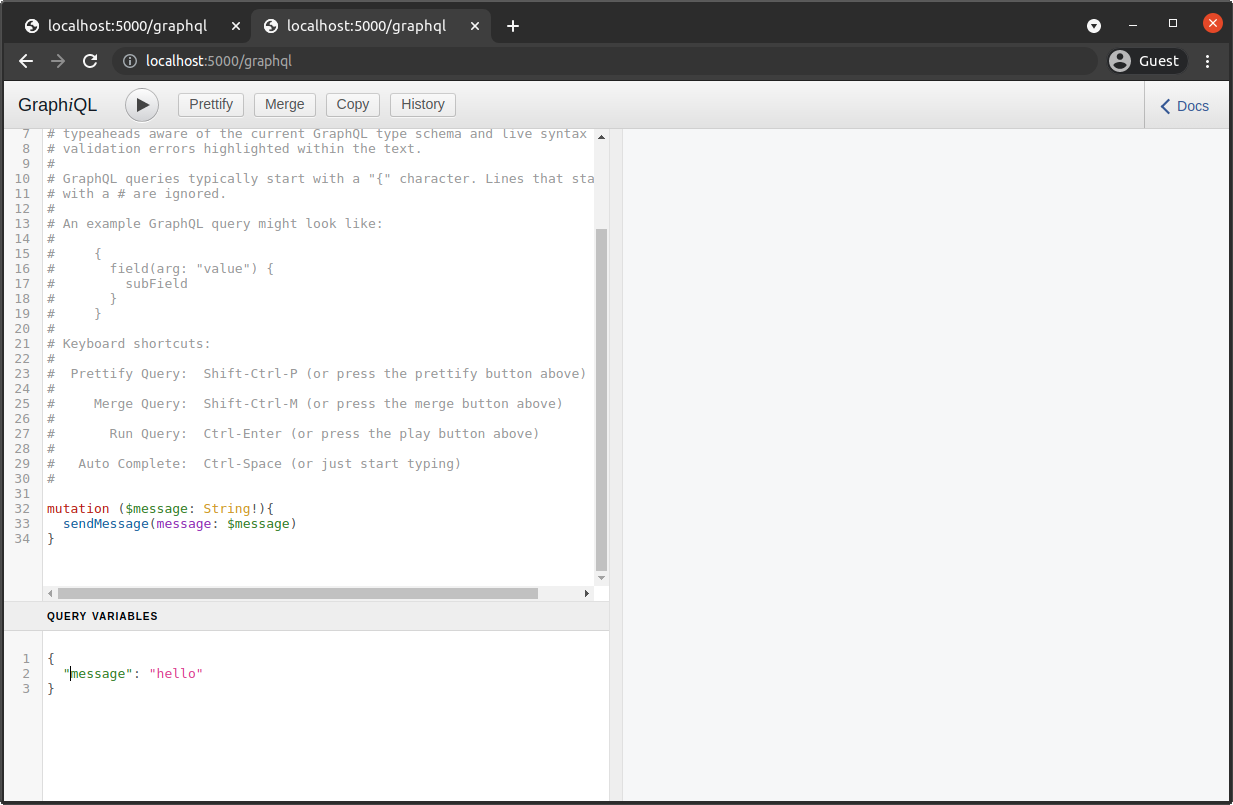 구독 페이지가 돌연변이 페이지에서 메시지를 "수신"하는지 확인합니다. 구독 페이지는 돌연변이 페이지에서 전송된 메시지를 수신해야 합니다. 여기서 전체 작업 코드를 찾을 수 있습니다. # 참고문헌 - https://github.com/enisdenjo/graphql-ws - https://www.apollographql.com/docs/apollo-server/data/subscriptions/ - https://typegraphql.com/docs/subscriptions.html
from http://it-ground.tistory.com/226 by ccl(A) rewrite - 2021-09-24 03:26:38